
Step 7#
Refer to drawings in Appendix C for details of fabrication and erection.
For modular sign panels, use three stiffeners (Type 2) at 580mm spacing per 1200mm high sign panel module (refer Figure 4.2.4(a)).
Table B.4 – Foundation strength category
| Strength category | Firm to stiff | Stiff to hard |
|---|---|---|
| Undrained shear strength, Cu (kPA) | 75 | 150 |
| Elastic modulus, E (kPa) | 8000 | 16,000 |
| Subgrade reaction modulus, k (MN/m³) | 30 | 60 |
| Field identification | Effort is required to penetrate with thumb or remould with fingers | Only indented by thumb and not possible to remould in fingers without adding water |
Table in words
- For cohesive clay soils, the strength category Firm to stiff has an undrained shear strength Cu of 75 kPA, an elastic modulus E of 8000 kPa, a subgrade reaction modulus k of 30 MN/m³, and field identification: Effort is required to penetrate with thumb or remould with fingers.
- For cohesive clay soils, the strength category Stiff to hard has an undrained shear strength Cu of 150 kPA, an elastic modulus E of 16,000 kPa, a subgrade reaction modulus k of 60 MN/m³, and field identification: Only indented by thumb and not possible to remould in fingers without adding water.
Table B.4 – Foundation strength category
| Strength category | Loose to medium dense | Dense |
|---|---|---|
| Friction angle | 35 | 45 |
| Elastic modulus, E (kPa) | 40,000 | 80,000 |
| Coefficient of modulus variation, (MN/m³) | 3 | 9 |
| Field identification | No significant resistance to excavation with spade penetration by crowbar | Noticeable resistance to excavation with spade or little penetration by crowbar |
Table in words
- For cohesionless sand soils, the strength category Loose to medium dense has a friction angle of 35, an elastic modulus E of 40,000 kPa, a coefficient of modulus variation of 3 MN/m³, and field identification: No significant resistance to excavation with spade penetration by crowbar.
- For cohesionless sand soils, the strength category Dense has a friction angle of 45, an elastic modulus E of 80,000 kPa, a coefficient of modulus variation of 9 MN/m³, and field identification: Noticeable resistance to excavation with spade or little penetration by crowbar.
Table B.5 – CHS post section equivalence table
| Post section from Figure B.2-13 DN | Post section from Figure B.2-13 Grade | Post section from Figure B.2-13 CHS outside diameter | Post section from Figure B.2-13 Wall thickness (mm) | Equivalent post section DN | Equivalent post section Grade | Equivalent post section CHS outside diameter | Equivalent post section Wall thickness (mm) |
|---|---|---|---|---|---|---|---|
| *50LT | LIGHT C350 | *60.3 | 2.9 | 50H | HEAVY C250 | 60.3 | 4.5 |
| *65LT | LIGHT C350 | *76.1 | 3.2 | 65H | HEAVY C250 | 76.1 | 4.5 |
| *80LT | LIGHT C350 | *88.9 | 3.2 | 80H | HEAVY C250 | 88.9 | 5.0 |
| 90LT | LIGHT C350 | 101.6 | 3.2 | 90H | HEAVY C250 | 101.6 | 5.0 |
| *100LT | LIGHT C350 | *114.3 | 3.6 | 100H | HEAVY C250 | 114.3 | 5.4 |
| 125LT | LIGHT C350 | 139.7 | 3.5 | *125M | MEDIUM C250 | *139.7 | 5.0 |
| 150LT | LIGHT C350 | 165.1 | 3.5 | *150M | MEDIUM C250 | *165.1 | 5.0 |
* Indicates Preferred Post Sizes
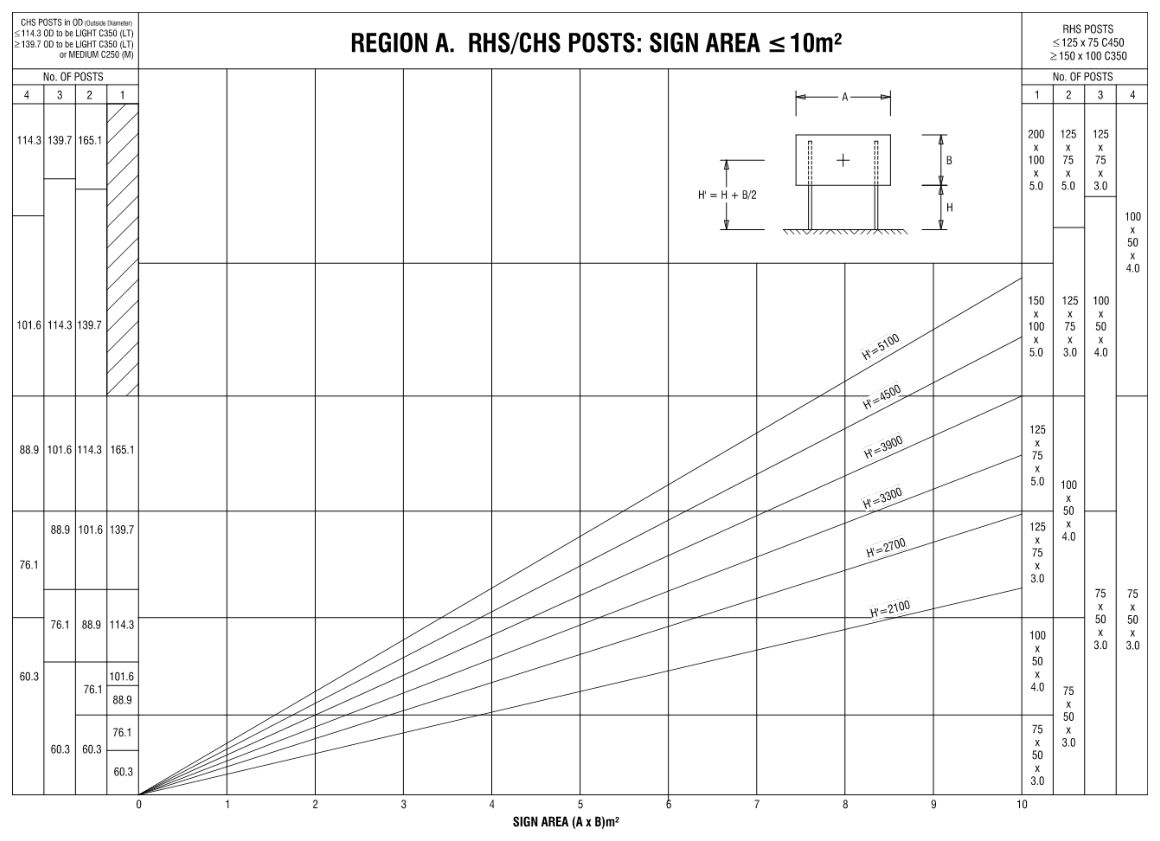
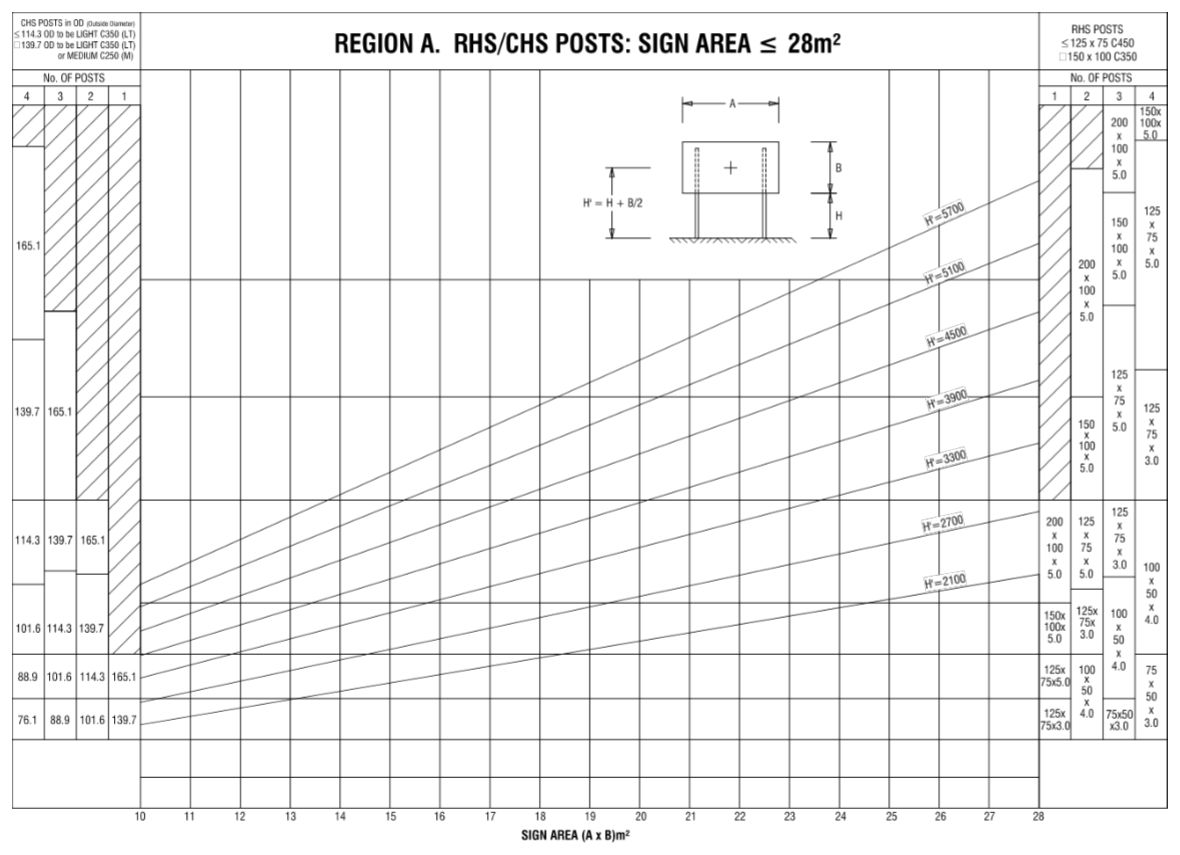
- 1.On uneven ground H = height of the tallest post.
- 2.For signs in exposed locations prone to high wind (unshielded terrain category 2 in AS1170.2) or where post collapse is more hazardous than normal situations, use charts for next wind region up from that derived from Figure B.1.
- 3.For breakaway posts with panel height, B, greater than 1.65 x H, select one size up from that derived on the graph. Increase support size additionally to any increase required for exposed locations in Note 2.
- 4.For larger signs, refer also to Figure B.6., Region A. RHS / CHS Posts: sign area ≤28m² and Figure B.10, Region A. RHS / CHS Posts: sign area ≤40m².
- 5.LT = light (C350), M = medium (C250). Refer Table B.5.
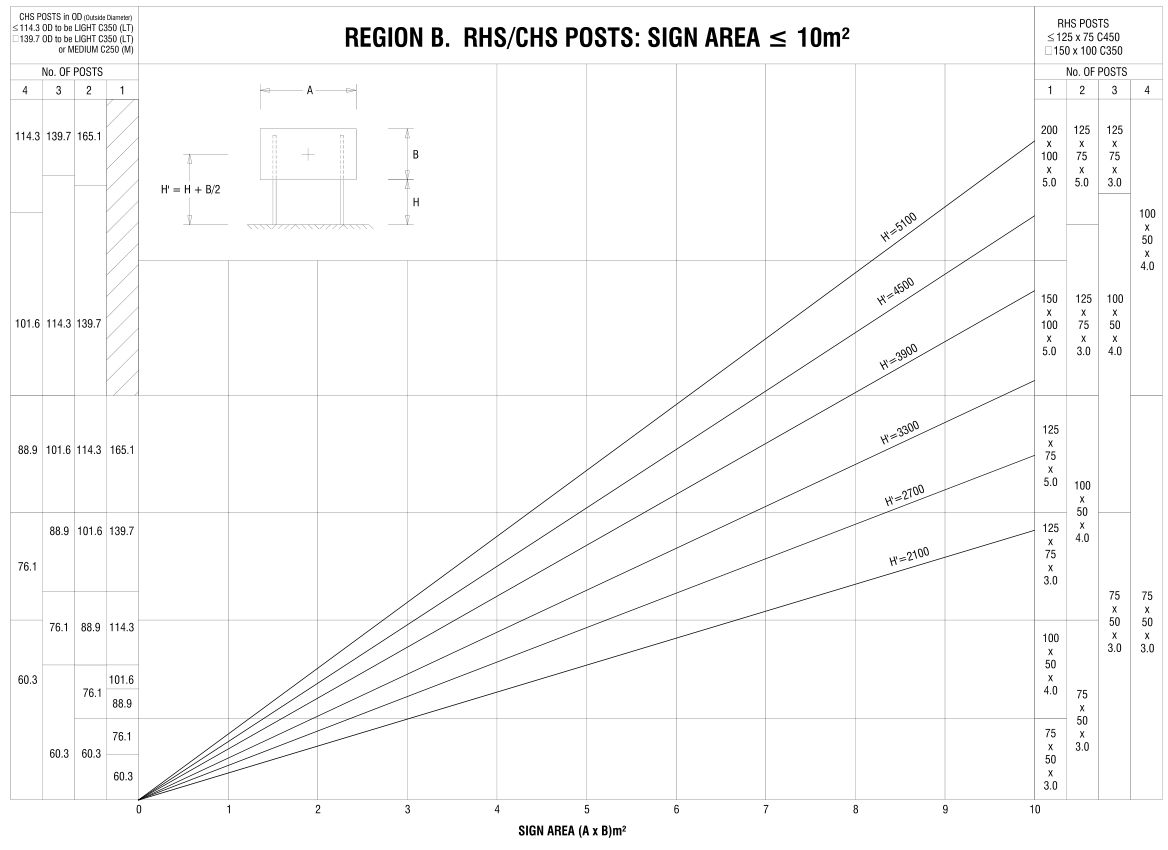
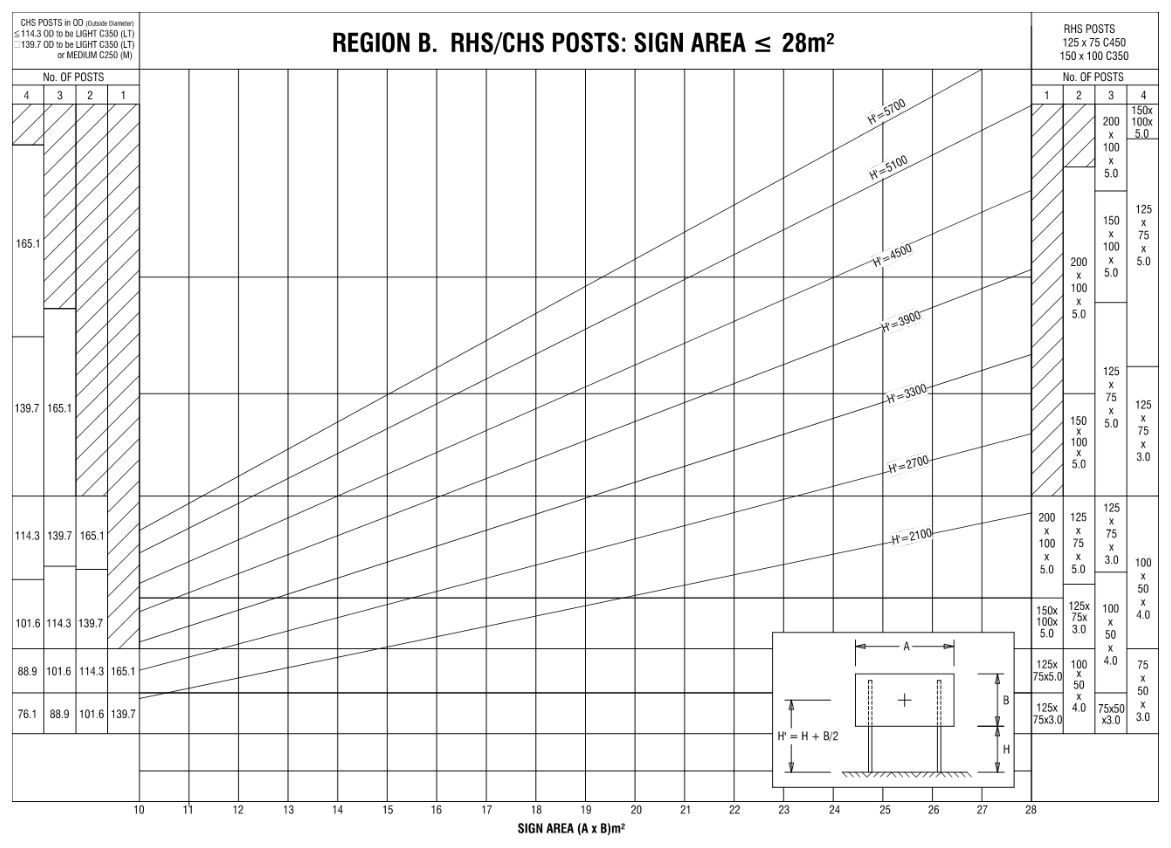
- 1.On uneven ground H = height of the tallest post.
- 2.For signs in exposed locations prone to high wind (unshielded terrain category 2 in AS1170.2) or where post collapse is more hazardous than normal situations, use charts for next wind region up from that derived from Figure B.1.
- 3.For breakaway posts with panel height, B, greater than 1.65 x H, select one size up from that derived on the graph. Increase support size additionally to any increase required for exposed locations in Note 2.
- 4.For larger signs, refer also to Figure B.7., Region B. RHS / CHS Posts: sign area ≤28m² and Figure B.11., Region B. RHS / CHS Posts: sign area ≤40m².
- 5.LT = light (C350), M = medium (C250). Refer Table B.5.
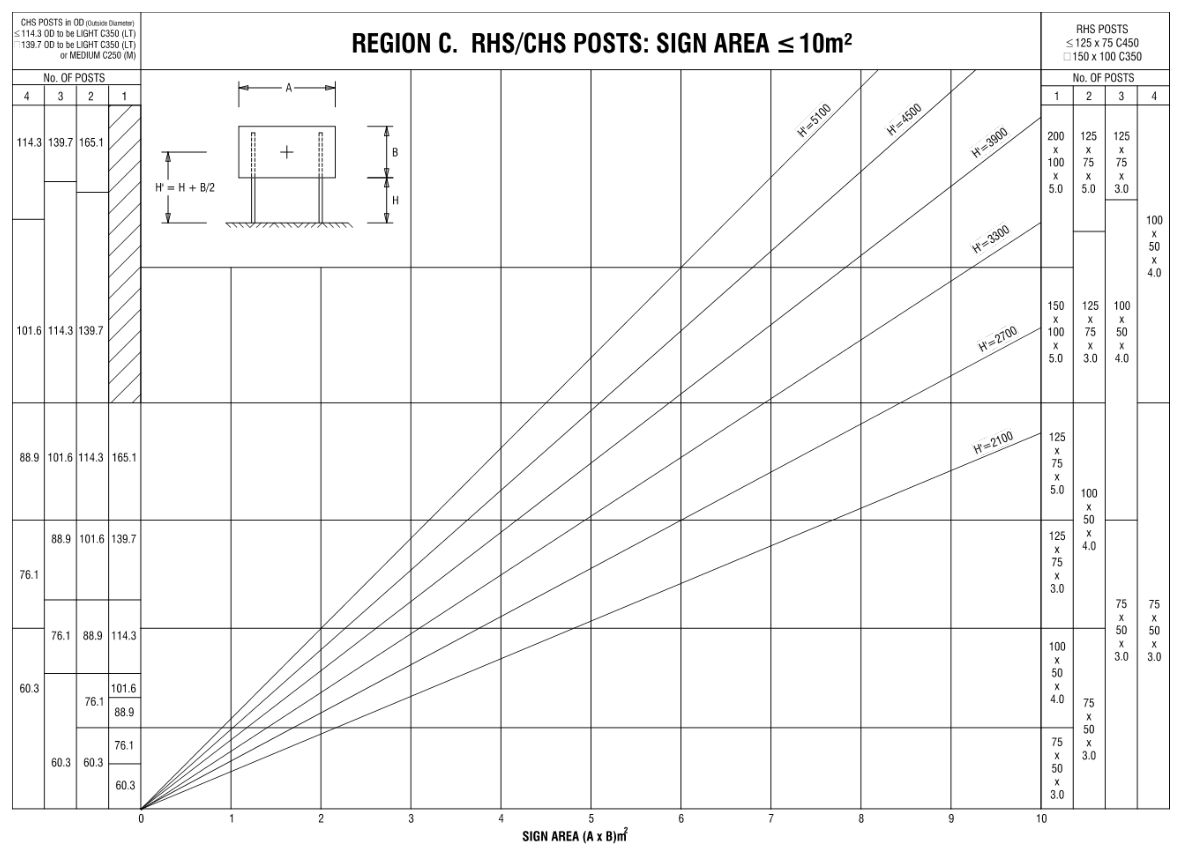
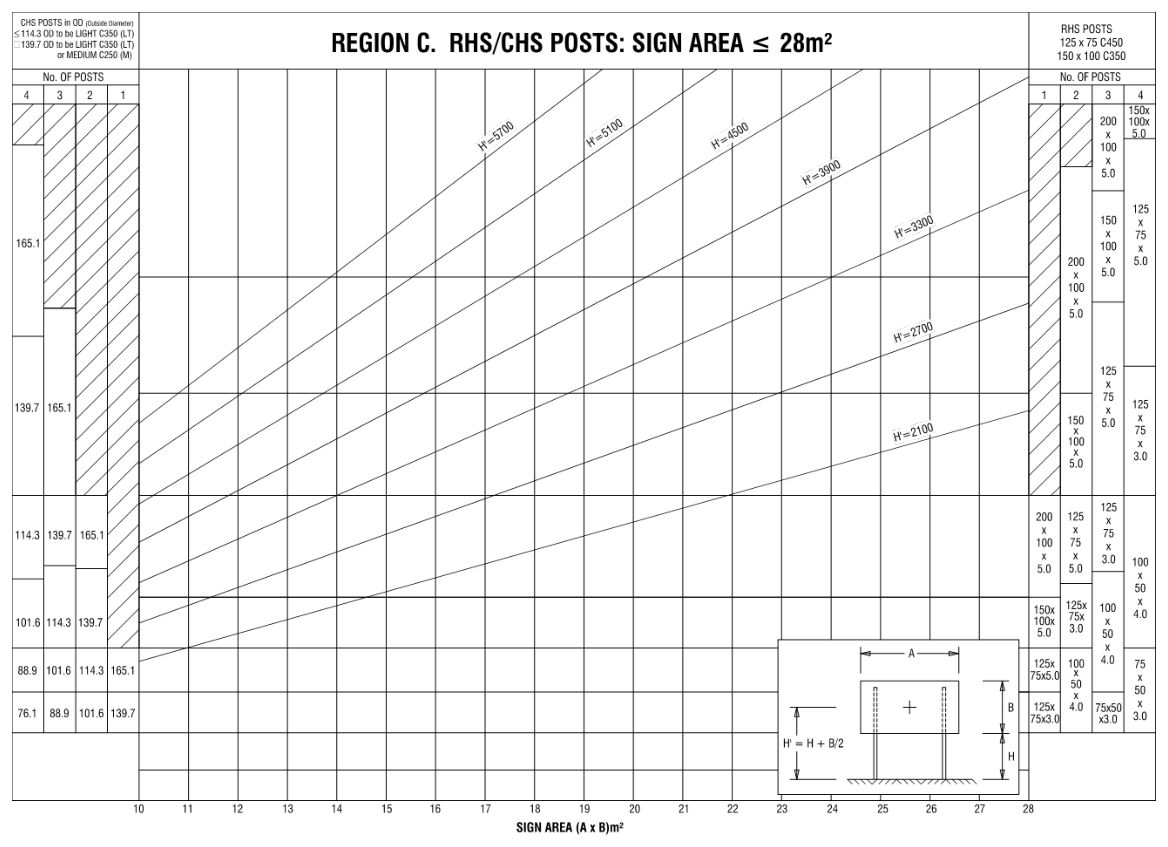
- 1.On uneven ground H = height of the tallest post
- 2.For signs in exposed locations prone to high wind (unshielded terrain category 2 in AS1170.2) or where post collapse is more hazardous than normal situations, use charts for next wind region up from that derived from Figure B.1.
- 3.For breakaway posts with panel height, B, greater than 1.65 x H, select one size up from that derived on the graph. Increase support size additionally to any increase required for exposed locations in Note 2.
- 4.For larger signs, refer also to Figure B.8., Region C. RHS / CHS Posts: sign area ≤28m² and Figure B.12, Region C. RHS / CHS Posts: sign area ≤40m².
- 5.LT = light (C350), M = medium (C250). Refer Table B.5.
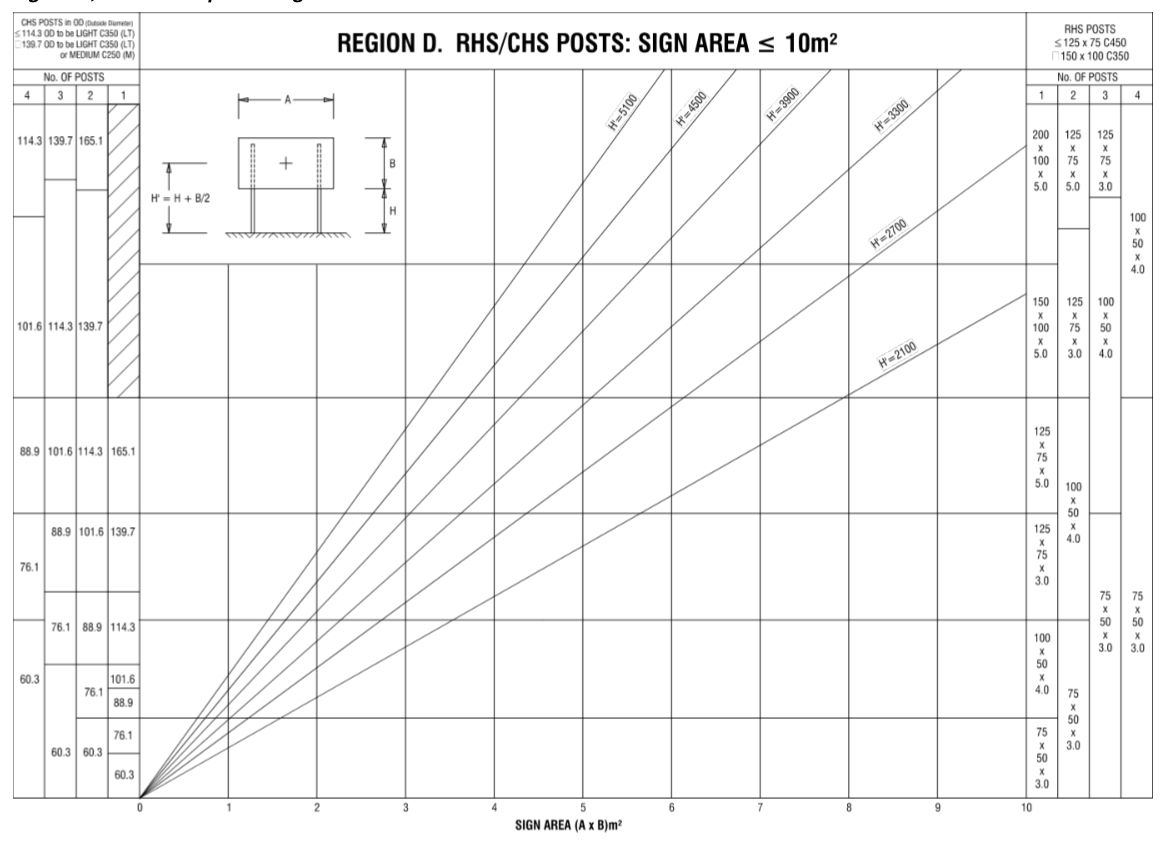
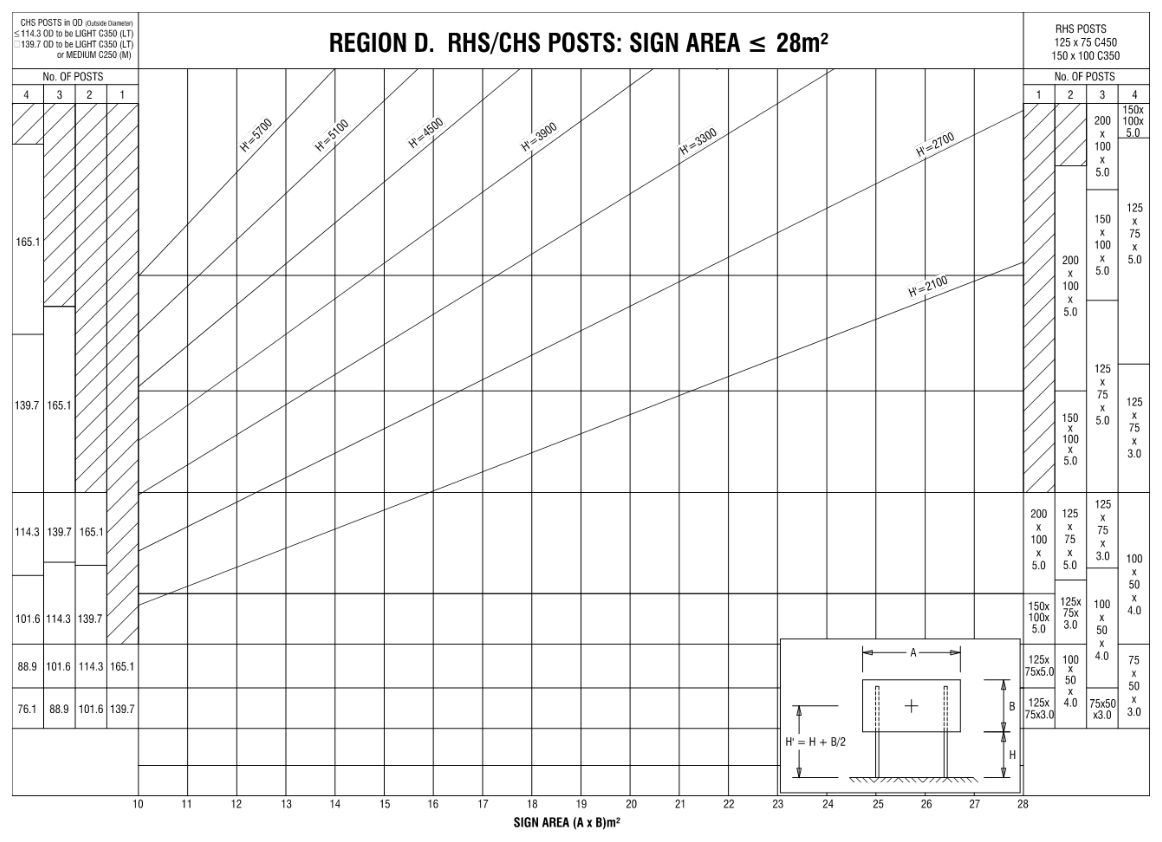
- 1.On uneven ground H = height of the tallest post
- 2.For signs in exposed locations prone to high wind (unshielded terrain category 2 in AS1170.2) or where post collapse is more hazardous than normal situations, use charts for next wind region up from that derived from Figure B.1.
- 3.For breakaway posts with panel height, B, greater than 1.65 x H, select one size up from that derived on the graph. Increase support size additionally to any increase required for exposed locations in Note 2.
- 4.For larger signs, refer also to Figure B.9., Region D. RHS / CHS Posts: sign area ≤28m² and Figure B.13, Region D. RHS / CHS Posts: sign area ≤40m².
- 5.LT = light (C350), M = medium (C250). Refer Table B.5.
- 1.On uneven ground H = height of the tallest post
- 2.For signs in exposed locations prone to high wind (unshielded terrain category 2 in AS1170.2) or where post collapse is more hazardous than normal situations, use charts for next wind region up from that derived from Figure B.1.
- 3.For breakaway posts with panel height, B, greater than 1.65 x H, select one size up from that derived on the graph. Increase support size additionally to any increase required for exposed locations in Note 2.
- 4.For larger signs, refer also to Figure B.2., Region A. RHS / CHS Posts: sign area ≤10m² and Figure B.10., Region A. RHS / CHS Posts: sign area ≤40m² respectively.
- 5.LT = light (C350), M = medium (C250). Refer Table B.5.
- 1.On uneven ground H = height of the tallest post
- 2.For signs in exposed locations prone to high wind (unshielded terrain category 2 in AS1170.2) or where post collapse is more hazardous than normal situations, use charts for next wind region up from that derived from Figure B.1.
- 3.For breakaway posts with panel height, B, greater than 1.65 x H, select one size up from that derived on the graph. Increase support size additionally to any increase required for exposed locations in Note 2.
- 4.For larger signs, refer also to Figure B.3., Region B. RHS / CHS Posts: sign area ≤10m² and Figure B.11., Region B. RHS / CHS Posts: sign area ≤40m² respectively.
- 5.LT = light (C350), M = medium (C250). Refer Table B.5.
- 1.On uneven ground H = height of the tallest post
- 2.For signs in exposed locations prone to high wind (unshielded terrain category 2 in AS1170.2) or where post collapse is more hazardous than normal situations, use charts for next wind region up from that derived from Figure B.1.
- 3.For breakaway posts with panel height, B, greater than 1.65 x H, select one size up from that derived on the graph. Increase support size additionally to any increase required for exposed locations in Note 2.
- 4.For larger signs, refer also to Figure B.4., Region C. RHS / CHS Posts: sign area ≤10m² and Figure B.12., Region C. RHS / CHS Posts: sign area ≤40m² respectively.
- 5.LT = light (C350), M = medium (C250). Refer Table B.5.
- 1.On uneven ground H = height of the tallest post
- 2.For signs in exposed locations prone to high wind (unshielded terrain category 2 in AS1170.2) or where post collapse is more hazardous than normal situations, use charts for next wind region up from that derived from Figure B.1.
- 3.For breakaway posts with panel height, B, greater than 1.65 x H, select one size up from that derived on the graph. Increase support size additionally to any increase required for exposed locations in Note 2.
- 4.For larger signs, refer also to Figure B.5., Region D. RHS / CHS Posts: sign area ≤10m² and Figure B.13., Region D. RHS/CHS Posts: sign area ≤40m² respectively.
- 5.LT = light (C350), M = medium (C250). Refer Table B.5.
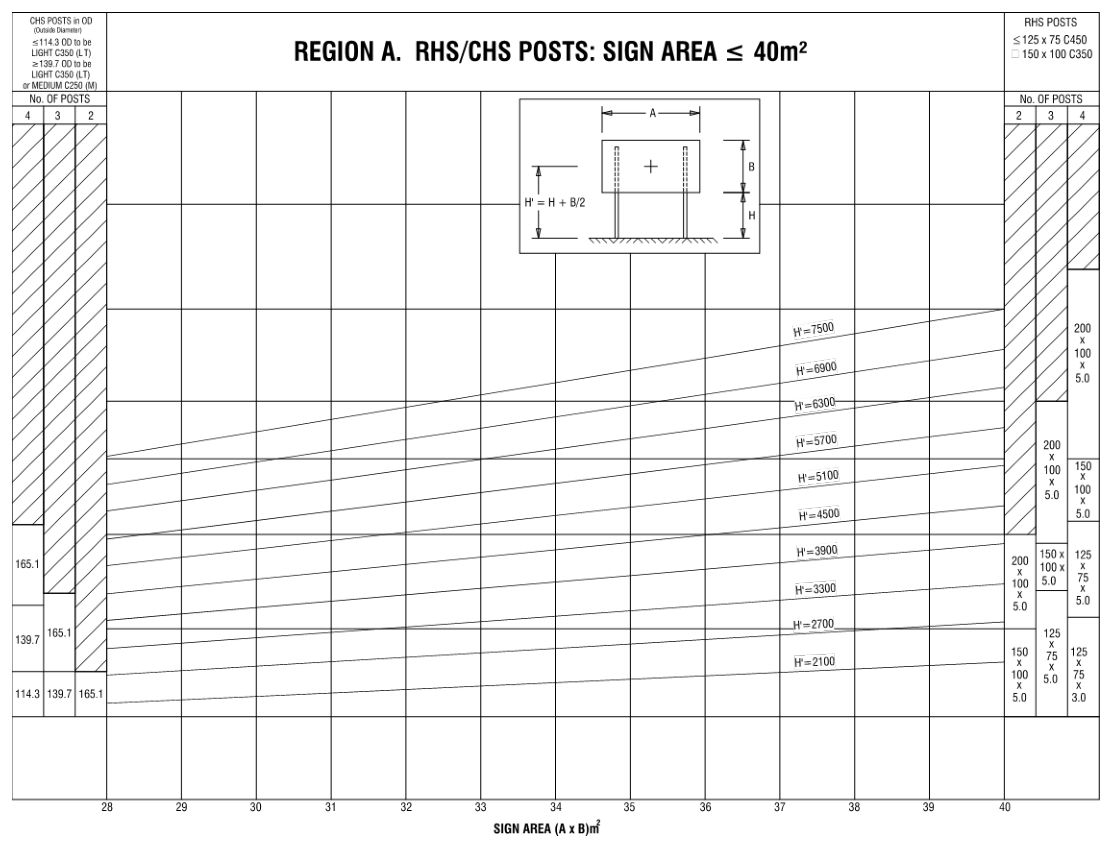
- 1.On uneven ground H = height of the tallest post
- 2.For signs in exposed locations prone to high wind (unshielded terrain category 2 in AS1170.2) or where post collapse is more hazardous than normal situations, use charts for next wind region up from that derived from Figure B.1.
- 3.For breakaway posts with panel height, B, greater than 1.65 x H, select one size up from that derived on the graph. Increase support size additionally to any increase required for exposed locations in Note 2.
- 4.For smaller signs, refer also to Figure B.2., Region A. RHS / CHS Posts: sign area ≤10m² and Figure B.6., Region A. RHS / CHS Posts: sign area ≤28m².
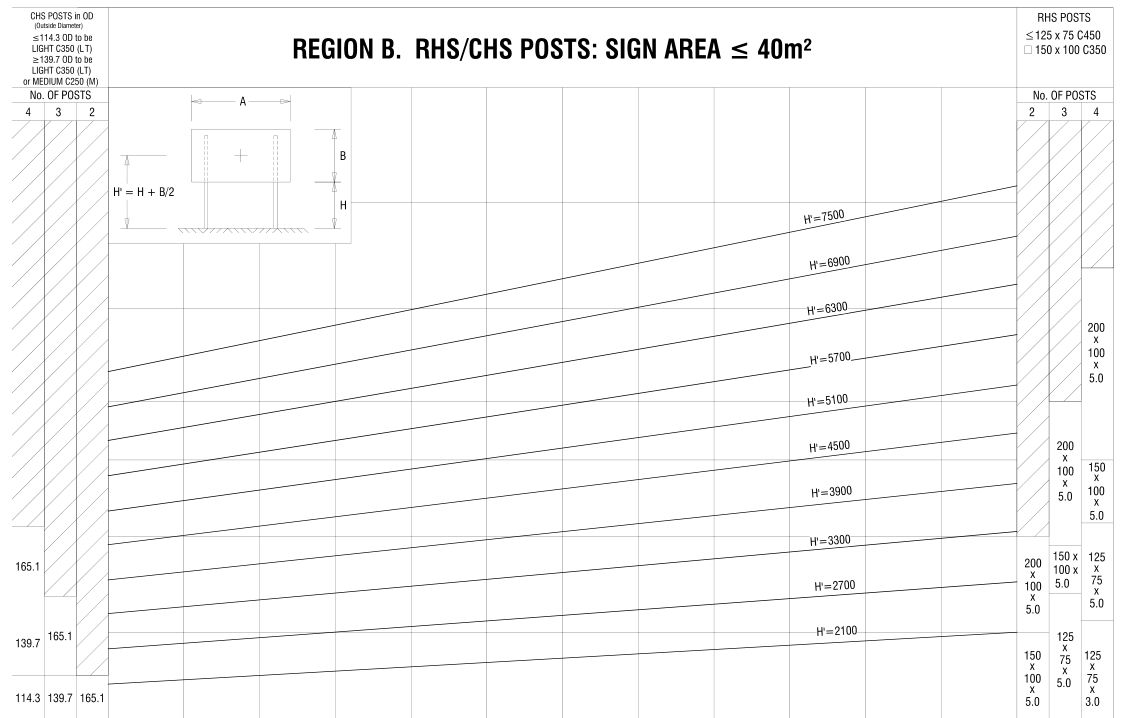
- 1.On uneven ground H = height of the tallest post
- 2.For signs in exposed locations prone to high wind (unshielded terrain category 2 in AS1170.2) or where post collapse is more hazardous than normal situations, use charts for next wind region up from that derived from Figure B.1.
- 3.For breakaway posts with panel height, B, greater than 1.65 x H, select one size up from that derived on the graph. Increase support size additionally to any increase required for exposed locations in Note 2.
- 4.For smaller signs, refer also to Figure B.3., Region B. RHS / CHS Posts: sign area ≤10m² and Figure B.7., Region B RHS / CHS Posts: sign area ≤28m².
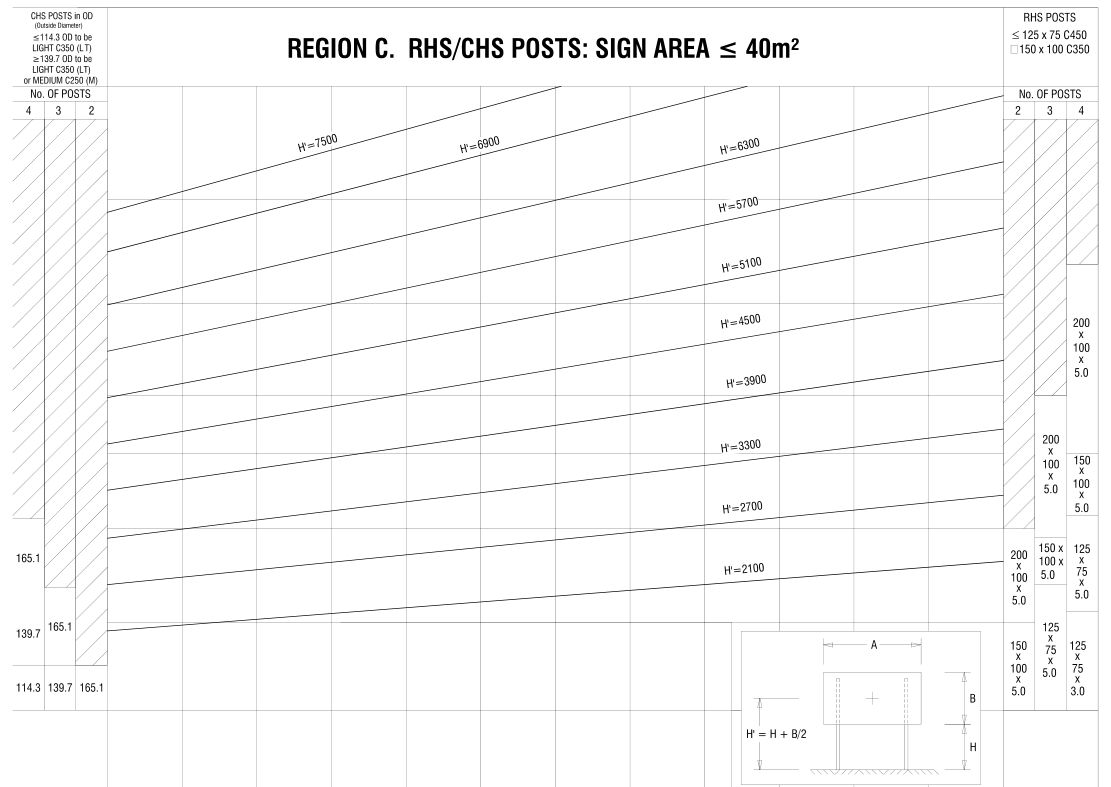
- 1.On uneven ground H = height of the tallest post.
- 2.For signs in exposed locations prone to high wind (unshielded terrain category 2 in AS1170.2) or where post collapse is more hazardous than normal situations, use charts for next wind region up from that derived from Figure B.1.
- 3.For breakaway posts with panel height, B, greater than 1.65 x H, select one size up from that derived on the graph. Increase support size additionally to any increase required for exposed locations in Note 2.
- 4.For smaller signs, refer also to Figure B.4., Region C. RHS / CHS Posts: sign area ≤10m² and Figure B.8., Region C. RHS / CHS Posts: sign area ≤28m².
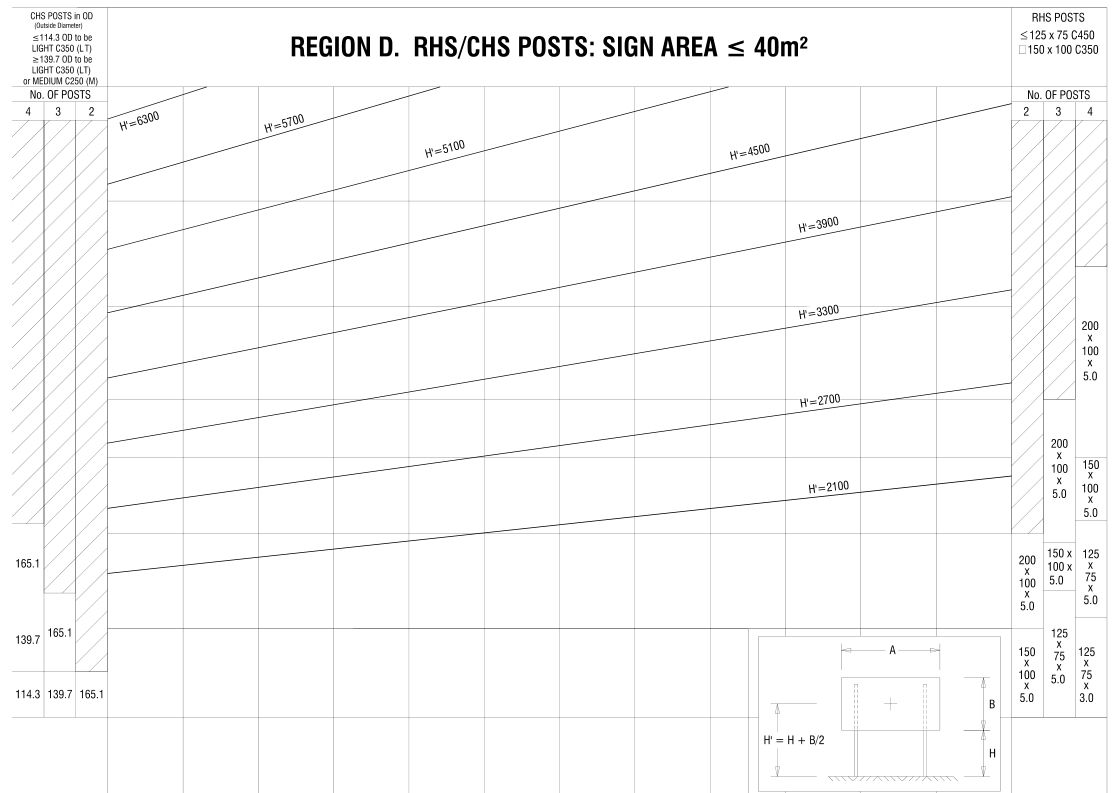
- 1.On uneven ground H = height of the tallest post.
- 2.For signs in exposed locations prone to high wind (unshielded terrain category 2 in AS1170.2) or where post collapse is more hazardous than normal situations, use charts for next wind region up from that derived from Figure B.1.
- 3.For breakaway posts with panel height, B, greater than 1.65 x H, select one size up from that derived on the graph. Increase support size additionally to any increase required for exposed locations in Note 2.
- 4.For smaller signs, refer also to Figure B.5., Region D. RHS / CHS Posts: sign area ≤10m² and Figure B.9., Region D. RHS / CHS Posts: sign area ≤28m².